60 Needle Gearhart
Worst case: If you have a Gearhart with Autoknitter needles, the needles are too short.
Having trouble getting your new/old sock knitter to work? This page shows detail of how a working machine looks when it is knitting a plain tube without the ribber.
Don't expect the machine to work right with the ribber unless the cylinder is knitting great before the ribber is installed!
On a machine that has not been used for a long time you will need plenty of oil. (All other machines need ample oil.) If it does not operate smoothly, you will need to disassembly it, clean all the moving parts and needles of rust and old, gummy oil. Then put some oil every place things rub together as you reassemble it.
"Smoothly" means: Cranks easily without dragging; should not take much force; you should not have to hold on to it ferociously with your other hand to prevent it from tipping.
DO NOT crank a machine with no yarn--you will damage needle latches. If you must crank it empty, adjust the yarn feeder away from the needle latches..
You may want to oil each needle latch the first time as recommended by Gearhart--as an absolute minimum you must make sure EVERY needle latch operates freely. Inspect and straighten all the latches bent to one side. Bent latches always bind at the full open and full closed positions. The sides of the cylinder below the spring must be oiled so the needles are lubricated in the slots and where the little nubs rub against the cams. Don't oil above the spring because it will soil the yarn. I run a bead of oil around the back of the cylinder, then crank the cam shell a half turn and oil the front. Sewing machine oil works good--so does gun oil. Automobile motor oil usually stinks.
You may need to knit about 10 feet (or more) of tube with scrap yarn until all the parts operate smoothly. This will also help remove excess oil before you put your good yarn on. I like to use cotton rug warp for this on machines using 12 gauge needles, because you can unravel it and use it over--that is what is on this machine in the pictures below. Some 80 needle Gearharts do not work well with rug warp, and no 100 N Gearhart will operate with rug warp. Since this is a machine, the products usually have an oily smell until washed.
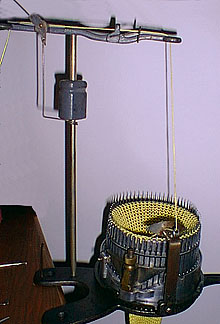
Gearhart 60 needle sock knitter. Circa 1920
|
60 Needle Gearhart |
|
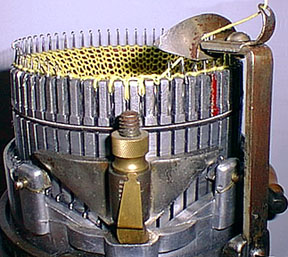
| The yarn stand must be used, but the heel spring wire is not necessary for plain knitting. The weight cannot be seen, but you will need a 1 1/2 to 4 pound weight hanging on the bottom of the knitted tube. It must uniformly pull on the tube--just hooking the weight without using the buckle can cause missed stitches where the yarn is loose on the needles. Make sure the machine is mounted level. Some folks just hold and pull on the bottom of the knitted tube instead of using the weight. This is almost a must when using the ribber. (Right, Elsie?) | Side view showing Tension (or V) cam. I have better luck when breaking in a new machine if I screw the adjustment knob down to almost the lowest position--but not so far that it creates drag on the mechanism. Notice how far down the needle went that is directly above the adjustment screw. If the needle does not go down far enough (or up high enough), it will not knit correctly. When the needles are in the normal mid position as in the back of the cylinder in this picture, the yarn rests on the open latches. If the machine will not correctly pull the loops and knit, it is possible that the machine has incorrect length needles. | |
|
|
|
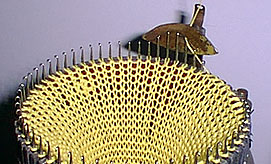
| View from other side. The yarn carrier
moves counter-clockwise in all the pictures. When the
needles rise to their highest point at the yarn carrier
head, the ends of the open latches must move up past the
loop of yarn around the needle. If it doesn't do this,
and the yarn moves up with the needle, you need more
weight hanging on the bottom of the knitted tube, or
perhaps the tension cam is not low enough and the needles
are making very small loops that the hooks can't slide
through.. Worst case: If you have a Gearhart with Autoknitter needles, the needles are too short. |
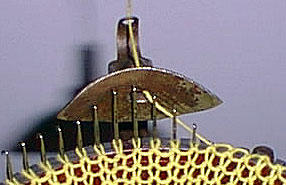
Close-up of yarn carrier head. Notice the tracks on the face of the head left by the needles as they just slightly touch the head. The carrier was set lower down at some previous time, because you can see two tracks to the right of the hole. You can adjust how close the head is to the needles on a Gearhart and Autoknitter, but the Master Machine lacks this adjustment; you may need to bend the stem. Play with different heights for the yarn carrier stem until you NEVER drop a stitch. If the needles don't hook the yarn with this set-up, try lowering the head about 1/16 inch. Make all adjustments in small increments so you can determine if it is getting better or worse. 1/8th of an inch change can make a lot of difference--more than you want! |
Copyright 1997, Ralph Kanko
|
|
|